
Tommy's Blog
Flow Matching
The purpose of this post is to develop an intuitive understanding of flow matching, a powerful state-of-the-art generative model. While many flow matching guides are pretty math heavy, this post focuses more on concrete concepts.
To develop our understanding of flow matching, we’ll take inspiration from the human drawing process. We’ll start by looking at how humans draw simple objects. From here we’ll build an intuition for how complex objects are drawn and finally work our way towards a formal definition of flow matching. By the end we’ll have trained a flow matching model that produces comparable results to diffusion models like DDIM, but is conceptually much simpler and uses 40% less sampling code.
This post is actually a bit of an accident. I was originally trying to develop a simpler version of diffusion but I ended up redefining flow matching 😅.
Drawing a Square
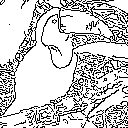
Let’s start with a simple image generation task like drawing a single black square on a white background and see where it takes us. To accomplish this task we might use the following algorithm. First we decide on the size and location of the square, then we execute the following drawing steps:
- draw the top side of the square
- draw the right side of the square
- draw the bottom side of the square
- draw the left side of the square
- fill in the square

Drawing a black square on a white background
Here’s the algorithm in code.
import random
import torch
from torchvision import transforms

def model(img, step, **kwargs):
    """
    Compute the change we need to make to `img`
    for a specific `step` in the drawing algorithm.

    Note:
        As black pixels = 0, white pixels = 1 we need to subtract 1
        when adding a black pixel to the white background.
    """
    h, w = img.size()
    x, y = kwargs["location"]
    size = kwargs["size"]
    change = torch.zeros(h, w)
    if step == 1: # draw top side of the square
        change[x, y:y+size] = -1.
        return change
    if step == 2: # draw right side of the square
        change[x:x+size, y+size] = -1.
        return change
    if step == 3: # draw bottom side of the square
        change[x+size, y:y+size] = -1.
        return change
    if step == 4: # draw left side of the square
        change[x:x+size, y] = -1.
        return change
    if step == 5: # fill in the square
        change[x:x+size, y:y+size] = -1.
        return change

# Let's create our blank page
img_height = img_width = 32
img = torch.ones(img_height, img_width)

# Select the size and location of the square
square_side_length = random.randint(4, img_height // 2)
top_x = random.randint(0, img_width - square_side_length-1)
top_y = random.randint(0, img_height - square_side_length-1)
top_left_corner = (top_x, top_y)

# Run our drawing algorithm
n_steps = 5
for step in range(1, n_steps+1):
    change = model(img, step, size=square_side_length, location=top_left_corner)
    img += change
transforms.ToPILImage()(img)
From the code we can see that our model is a function that takes the current image img, the current algorithm step step, and tells us what change we need to make to img.
Starting with a blank page (white image) at step 0, the model tells us to add the top side of the square. We then add this change to img and increment our step. We repeat this process for every step in our drawing algorithm, passing the latest img and step to model.
General Drawing Algorithm
Ok, we’ve created a killer square drawing algorithm but what if we want to generate more interesting things like a photo of a toucan? Unfortunately there isn’t a straightforward way to extend our Squares algorithm to draw more complex things 😢. If we can’t hardcode a general algorithm perhaps we can build one using data instead?
To build an algorithm using data we need to train a model (e.g. a neural network) on a dataset of input and output pairs. In our case the input would be an image and the current step in the drawing algorithm. The output is the change we need to make to the image.
the key question is how do we design a drawing algorithm that is easy for a neural network learn.
First Attempt
As we no longer need to hardcode each step in the drawing algorithm like we did for the Squares algorithm, we can use more general higher level drawing steps that the network will learn through data. Here’s an example of one possible general drawing algorithm which we’ll call the ORGB algorithm:
- draw the outline
- add red
- add blue
- add green
ORGB Algorithm
While the ORGB algorithm should allow us to draw complex images, it will be difficult to train a neural network to learn it. Neural networks train better using smooth continuous data but the steps in this algorithm are sharp and jagged. What could we use instead?
Second Attempt
If we squint our eyes a little, we can see that each step in both the Squares algorithm and the ORGB algorithm basically adds a little piece of the final image at each step. Both algorithms do this in a way that loosely mimics how a human might draw. Let’s abandon these human like drawing steps and instead focus on creating a smooth, continuous set of drawing steps that are more suitable for a neural network.
One way we could this is to add something like 1% of the final image at each step in our algorithm. If we design our algorithm to have 100 steps, then at step 70 the image will contain 30% of the starting image and 70% of the final image.
Here’s the algorithm in mathematical form:
$$ x_n = (1-n)z + nx $$
- $x_n$ image at step n
- n: step in the process [0 to 1] (e.g. step 70 would be 0.7)
- z: starting image (blank page)
- x: the final image (e.g. toucan photo)

Smooth and continuous drawing algorithm
Ok, now that we have our drawing algorithm let’s train a model to predict $x_{n+1}$ - $x_n$ (i.e. the change we need to make to $x_n$). To train a model we need to define input/output pairs for our training dataset. Let’s create a single input/output pair as follows:
- $n$: select a random drawing algorithm step (a float between 0 and 1)
- $x$: pluck a random image from our dataset
- $z$: generate a white image with the same size as $x$
- compute $x_n$: $(1-n)z + nx$
- compute $x_{n+1}$: $(1-(n+0.01))z + (n+0.01)x$
- pass ($x_n$, $n$) as input to the model, use ($x_{n+1}$ - $x_n$) as the output
Unfortunately, the model fails to learn anything useful when using the input/outputs pairs above 😭. One of the reasons could be that the difference between $x_{n+1}$ and $x_n$ is tiny. As a result the model can achieve a low loss by simply predicting all zeros or something close to all zeros.
Third Attempt
What now? As our drawing algorithm is smooth and continuous this allows us to crack open the calculus toolbox. Let’s see if we can use it to find an alternative way to represent $x_{n+1}$ - $x_n$.
Recall the basic definition of a derivative:
$$ \frac{df}{dx}\ = \lim_{h \to 0} \frac{f(x+h) - f(x)}{h} $$
Let’s rewrite it using our own variables:
$$ \frac{dx_{n}}{dn}\ = \frac{x_{n+1} - x_{n}}{\Delta n} $$
Let’s isolate $x_{n+1}$ - $x_n$:
$$ x_{n+1} - x_{n} = \frac{dx_{n}}{dn}\ \Delta n $$
Ok, we now have an alternative definition for $x_{n+1}$ - $x_n$. As $\Delta n $ is simply a constant, if we can figure out how to compute $\frac{dx_{n}}{dn}$ then we can tweak our training dataset and attempt to train a model.
Recall the definition of $x_n$
$$x_n = (1-n)z + (n)x$$
Computing $\frac{dx_{n}}{dn}$ is pretty straightforward \begin{aligned} \frac{dx_{n}}{dn} &= -z+x \newline &= x-z \end{aligned}
Here’s our new definition $$x_{n+1} - x_{n} = (x-z)\Delta n$$
As $\Delta n$ is a constant $\frac{1}{n}$, we can ignore it during training and instead scale the model’s output by $\Delta n$ during inference.
Finally, this gives us the following input, outputs pairs:
- input: ($x_n$, n)
- output: $x-z$
Before we start training we need to make one last modification. To a human, a blank page allows us to create any image we want. It is an unbridled source of creativity. To a neural net the opposite is true. A blank page represents a fixed starting point and constrains creativity. To enable more diverse images let’s use a random starting point instead.
Putting everything together, here’s our training set creation process:
- $n$: select a random drawing algorithm step [a float between 0 and 1]
- $x$: pluck a random image from the dataset
- $z$: generate an image of pure random noise with the same size as $x$
- compute $x_n$: $(1-n)z + nx$
- pass ($x_n$, $n$) as input to the model, use $x-z$ as the output
Here’s the same process in code.
def noisify(x):
    device = x.device
    n = torch.rand(len(x),).to(x).clamp(0,0.999)
    nr = n.reshape(-1, 1, 1, 1)
    z = torch.randn(x.shape, device=device)
    xn = ((1-nr)*z + nr*x).to(device)
    return (xn, n.to(device)), x-z
Training
To train our model we’ll be using FastAI’s miniai framework from their fantastic 2022 Diffusion course.
Almost all the code is plucked straight from the conditional diffusion notebook.
Implementing flow matching requires two changes to the notebook. The first is a minor tweak to the noisify method (shown above) that creates our training dataset.
The second change is to the sample method used to generate our images. Here’s the flow matching sample method.
@torch.no_grad()
def sample(model, sz, n_steps):
    steps = torch.linspace(0,1, n_steps)
    xn = torch.randn(sz).cuda()
    dn = 1.0 / n_steps
    preds = []
    for _, step in enumerate(progress_bar(steps)):
        step = step[None].cuda()
        dxn_dn = model((xn, step))
        xn += (dxn_dn*dn)
        preds.append(xn.float().cpu())
    return preds

sample(model, sz, steps=100)
Note: The sample method in the notebook includes a class label c which allows us to generate images for specific classes.
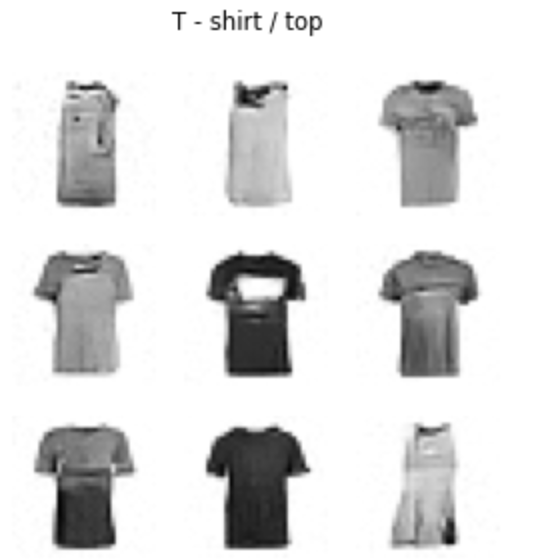
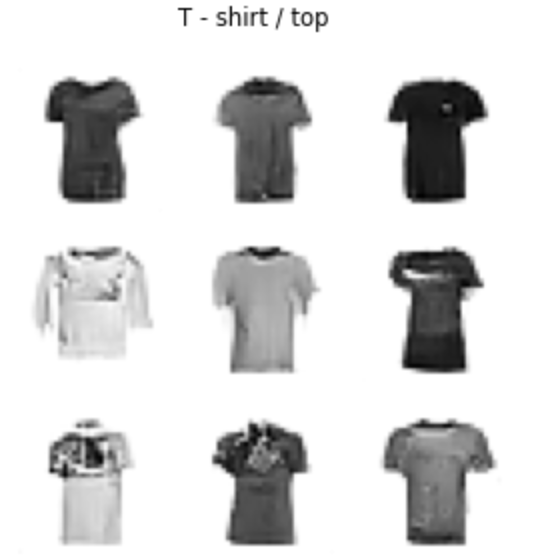
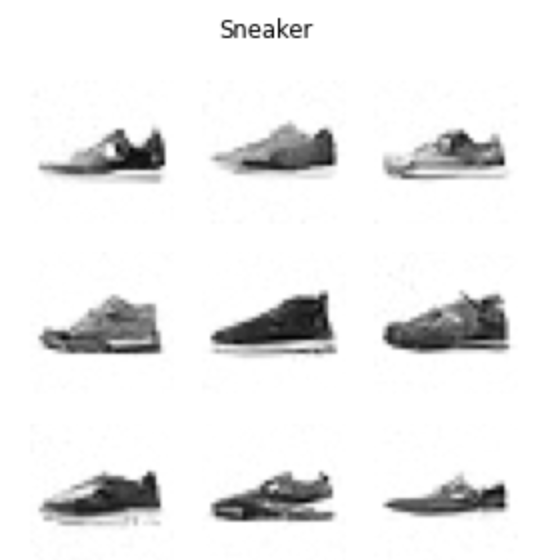
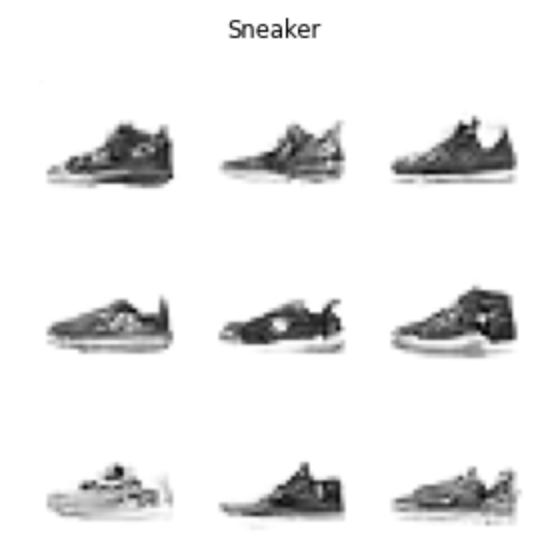
Results
Here are the results after training the flow matching model on Fashion MNIST for 5 epochs (~3mins) on an A100. As a benchmark, a DDIM diffusion model was also trained. To my (probably biased) eye the images are of comparable quality.
Conclusion
That’s it. We’ve developed a flow matching model that generates images of comparable quality to diffusion variants like DDIM, is conceptually much simpler, and uses 40% less sampling code 🥳.
The flow matching training notebook and setup instructions can be found in this repo. If you have any comments or questions feel free to message me at tommyc.xyz@proton.me